Indian Dishes Made with Rice Flour
Rice flour is a staple ingredient in Indian cuisine, celebrated for its versatility and ability to create a myriad of mouthwatering dishes. From crispy snacks to indulgent desserts, rice flour forms the foundation of numerous culinary delights across the diverse regions of India. In this blog post, we’ll embark on a culinary journey to discover five delightful Indian dishes crafted with rice flour, each offering a unique blend of flavors and textures.
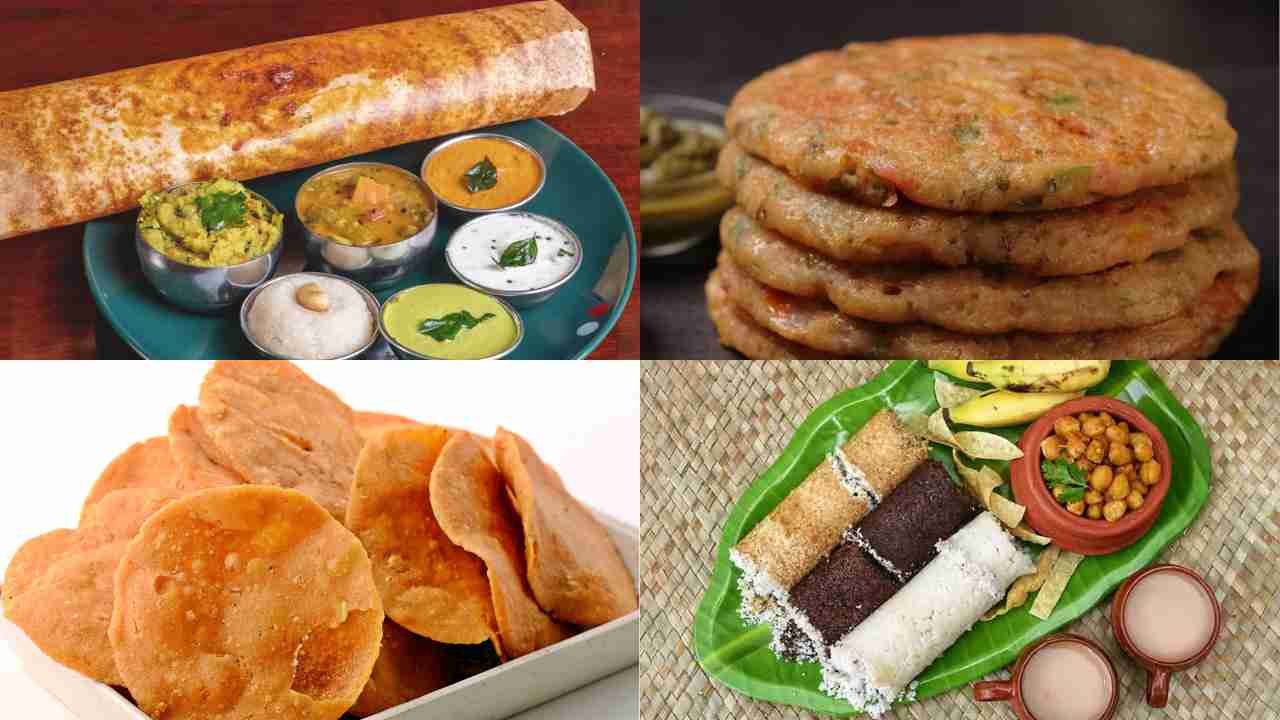
1. Dosa: A South Indian Culinary Classic
Dosa is not just a dish; it’s a culinary icon deeply ingrained in the cultural fabric of South India. This savory crepe-like delight is beloved not only in its region of origin but across the globe for its crispy texture, subtle sourness, and versatility. Let’s delve deeper into the intricacies of dosa, exploring its origins, ingredients, preparation methods, and its rich cultural significance.
Origins and Cultural Significance: Dosa traces its roots back to the southern Indian state of Karnataka, although it’s now a staple across the entire southern region, including Tamil Nadu, Kerala, and Andhra Pradesh. Legend has it that dosa has been part of South Indian cuisine for centuries, with mentions dating back to ancient texts like the Manasollasa, a 12th-century Sanskrit encyclopedia.
Culturally, dosa holds immense significance beyond just being a delicious dish. It’s a symbol of hospitality, often served to guests as a gesture of warmth and welcome. Additionally, dosa plays a central role in religious festivals and ceremonies, where it’s offered as prasadam (sacred food) to deities.
Ingredients: While the basic ingredients for dosa are simple – rice and black gram (urad dal) – it’s the proportions, fermentation process, and technique that elevate it to culinary greatness. Traditionally, dosa batter is made by soaking rice and urad dal separately for several hours, then grinding them into a smooth paste. This batter is then left to ferment overnight, allowing natural bacteria to work their magic, resulting in a light, airy texture and a subtle tangy flavor.
Preparation Method: The process of making dosa is an art form in itself, requiring skill and precision. After fermenting the batter, it’s thinned down to a pourable consistency with water and seasoned with salt. A flat griddle or tawa is heated, and a ladleful of batter is poured onto it, then spread out in a circular motion to form a thin layer. A drizzle of oil or ghee around the edges helps to crisp it up.
Once the underside turns golden brown and crispy, the dosa is flipped over to cook briefly on the other side. The end result is a delicate, lacy crepe with a crispy exterior and a soft, fluffy interior.
Varieties and Accompaniments: While the classic dosa is a thing of beauty on its own, there are countless variations to explore. Masala dosa, perhaps the most famous variant, features a filling of spiced mashed potatoes, adding a flavorful twist to the original. Other variations include rava dosa (made with semolina), onion dosa, cheese dosa, and more, each offering its own unique flavor profile.
Dosa is typically served hot off the griddle, accompanied by an array of chutneys and sambar, a lentil-based vegetable stew. The combination of crispy dosa, spicy chutneys, and flavorful sambar creates a harmonious symphony of flavors that’s unparalleled.
2. Rice Cheela: A Delectable Indian Breakfast Delight
Rice cheela, also known as rice chilla or rice pancake, is a delightful Indian breakfast item that’s both simple to make and incredibly satisfying to eat. Originating from North India, this savory pancake is made from a batter of rice flour, besan (gram flour), and a variety of spices, creating a thin, crispy texture with a burst of flavor in every bite. Let’s dive deeper into the intricacies of rice cheela, exploring its ingredients, preparation method, variations, and its place in Indian culinary culture.
Ingredients: The beauty of rice cheela lies in its simplicity, requiring only a handful of basic ingredients commonly found in Indian kitchens. The primary components include rice flour and besan, which form the base of the batter. To enhance flavor and aroma, a medley of spices such as cumin seeds, turmeric, chili powder, and chopped coriander leaves are added. Water is used to bring the batter to the desired consistency, and salt is added to taste. Optional ingredients like grated vegetables or paneer (Indian cottage cheese) can also be incorporated for added nutrition and flavor.
Preparation Method: Making rice cheela is a straightforward process that involves mixing the ingredients to form a smooth batter, then ladling it onto a hot griddle or tawa to cook. Here’s a basic outline of the preparation method:
- Prepare the Batter: In a mixing bowl, combine rice flour, besan, spices, chopped coriander leaves, and salt. Gradually add water while stirring to form a lump-free batter with a pourable consistency. Allow the batter to rest for a few minutes to allow the flavors to meld.
- Cooking the Cheela: Heat a non-stick griddle or tawa over medium heat and lightly grease it with oil or ghee. Once hot, pour a ladleful of batter onto the center of the griddle and spread it out in a circular motion to form a thin, even layer.
- Add Toppings (Optional): For additional flavor and texture, you can sprinkle grated vegetables, paneer, or cheese over the surface of the cheela before it sets.
- Cook Until Golden and Crispy: Allow the cheela to cook undisturbed until the edges start to lift and the underside turns golden brown and crispy. Drizzle a little oil or ghee around the edges, then carefully flip the cheela using a spatula and cook the other side until golden brown.
- Serve Hot: Once cooked to perfection, transfer the rice cheela to a serving plate and serve hot with a side of chutney, pickle, or yogurt for a delicious and nutritious breakfast or snack.
Variations and Accompaniments: While the basic rice cheela recipe is delightful on its own, there are endless variations and accompaniments to explore. You can customize the filling with your favorite ingredients like grated carrots, finely chopped onions, bell peppers, spinach, or even leftover cooked vegetables. For added protein, you can also incorporate cooked lentils or sprouts into the batter.
Rice cheela pairs beautifully with a variety of condiments and side dishes, including tangy green chutney made from coriander and mint, zesty tomato chutney, spicy garlic pickle, or creamy yogurt raita. These accompaniments complement the flavors of the cheela and add an extra dimension to the overall dining experience.
3. Khichu: A Flavorful Gujarati Snack
Khichu is a traditional Gujarati snack that holds a special place in the hearts and palates of those who have had the pleasure of tasting it. Simple yet bursting with flavor, khichu is made from rice flour and seasoned with spices, resulting in a dough-like consistency that’s both comforting and satisfying. Let’s delve deeper into the intricacies of khichu, exploring its origins, ingredients, preparation method, variations, and its cultural significance in Gujarati cuisine.
Origins and Cultural Significance: Khichu has its roots in the vibrant culinary landscape of Gujarat, a western state in India known for its rich traditions and diverse cuisine. While its exact origins are unclear, khichu has been a staple in Gujarati households for generations, often enjoyed as a wholesome snack or light meal. Beyond its culinary appeal, khichu holds cultural significance as a dish that brings people together, whether shared among family members during gatherings or served to guests as a gesture of hospitality.
Ingredients: The beauty of khichu lies in its simplicity, with just a handful of basic ingredients needed to create its comforting flavor profile. The primary component is rice flour, which forms the base of the dish. Water is added to the rice flour to create a smooth, thick batter, which is then seasoned with a blend of spices such as cumin seeds, ajwain (carom seeds), turmeric, green chilies, and salt. Some variations of khichu also incorporate grated ginger, garlic, or fresh coriander leaves for added aroma and flavor.
Preparation Method: Making khichu is a straightforward process that requires minimal effort but yields delicious results. Here’s a basic outline of the preparation method:
- Prepare the Batter: In a saucepan, bring water to a boil, then gradually add rice flour while stirring continuously to prevent lumps from forming. Reduce the heat to low and continue stirring until the mixture thickens to a dough-like consistency.
- Season with Spices: Once the rice flour mixture reaches a dough-like consistency, add the spices – cumin seeds, ajwain, turmeric, chopped green chilies, and salt. Mix well to incorporate the spices evenly into the dough, adjusting the seasoning to taste.
- Cook Until Smooth: Continue cooking the khichu mixture over low heat, stirring constantly, until it becomes smooth and pliable. The khichu is ready when it pulls away from the sides of the pan and forms a cohesive mass.
- Shape and Serve: Remove the khichu dough from the heat and allow it to cool slightly. While still warm, divide the dough into small portions and shape them into smooth balls or cylindrical shapes using greased hands or a mold. Serve the khichu hot, garnished with a drizzle of oil or ghee and fresh coriander leaves for added flavor and aroma.
Variations and Accompaniments: While the basic khichu recipe is delicious on its own, there are countless variations and accompaniments to explore. Some popular variations include adding grated vegetables like carrots or spinach to the dough for added nutrition and texture. Additionally, khichu can be served with a variety of accompaniments such as sev (crispy chickpea noodles), green chutney, pickle, or yogurt, which complement its flavors and add an extra dimension to the overall dining experience.
4. Puttu – A South Indian Culinary Gem
Puttu, a traditional South Indian dish, is a culinary masterpiece revered for its unique texture, subtle flavors, and rich cultural heritage. Originating from the state of Kerala but cherished across the southern region of India, puttu is a steamed cylindrical cake made primarily from rice flour and grated coconut. Let’s embark on a journey to unravel the intricacies of puttu, exploring its origins, ingredients, preparation method, variations, and its significance in South Indian cuisine.
Origins and Cultural Significance: Puttu holds a special place in the culinary tapestry of Kerala, where it’s not just a dish but a cultural symbol deeply rooted in tradition. Historically, puttu was considered a staple food among the working class in Kerala, owing to its simplicity, affordability, and nutritional value. Over time, it evolved into a beloved breakfast item enjoyed by people of all backgrounds, especially during festive occasions and celebrations. Today, puttu remains an integral part of Kerala’s culinary heritage, representing the region’s rich culinary traditions and cultural diversity.
Ingredients: The beauty of puttu lies in its simplicity, with just a few basic ingredients needed to create its distinctive flavor and texture. The primary components include rice flour and grated coconut, which form the base of the dish. Water is used to moisten the rice flour, and salt is added to enhance the flavor. Depending on personal preferences and regional variations, other ingredients such as wheat flour, ragi (finger millet) flour, or jaggery may also be incorporated into the puttu mixture to add nutritional value or sweetness.
Preparation Method: Making puttu is a labor of love that requires patience and attention to detail. Here’s a basic outline of the preparation method:
- Prepare the Puttu Mixture: In a mixing bowl, combine rice flour with grated coconut and a pinch of salt. Gradually add water while mixing the ingredients with your fingertips until the mixture resembles coarse crumbs. The consistency should be crumbly yet moist enough to hold its shape when pressed together.
- Steam the Puttu: Fill the cylindrical chamber of a puttu maker or puttu kutti (a specialized steaming vessel) with alternating layers of the prepared puttu mixture and grated coconut. Place the puttu maker over a pot of boiling water or in a steamer, and steam for about 8-10 minutes until the puttu is cooked through and has a fluffy texture.
- Serve Hot: Once steamed, gently unmold the puttu onto a serving plate or banana leaf. Serve hot with accompaniments such as kadala curry (black chickpea curry), banana, sugar, or grated coconut for a delightful breakfast or snack experience.
Variations and Accompaniments: While the classic puttu recipe is cherished for its simplicity and purity of flavors, there are numerous variations and accompaniments to explore. Some popular variations include using different flours such as wheat flour or ragi flour instead of rice flour to create puttu with unique textures and flavors. Additionally, puttu can be served with a variety of accompaniments such as ripe bananas, grated coconut, sugar, or kadala curry, each adding its own distinct flavor profile and enhancing the overall dining experience.
5. Thattai: A Crispy South Indian Delight
Thattai, a crispy and savory snack originating from South India, is a beloved treat enjoyed across the region and beyond. Known for its unique texture, rich flavor, and versatility, thattai holds a special place in South Indian culinary culture. Let’s delve deeper into the intricacies of thattai, exploring its origins, ingredients, preparation method, variations, and cultural significance.
Origins and Cultural Significance: Thattai has its roots in Tamil Nadu, a southern state in India renowned for its rich culinary heritage. While the exact origins of thattai are unclear, it has been a cherished snack in Tamil households for generations. Traditionally made during festivals, celebrations, and special occasions, thattai holds cultural significance as a symbol of hospitality and festive cheer. It is often shared among friends and family as a token of love and camaraderie.
Ingredients: The beauty of thattai lies in its simplicity, with a handful of basic ingredients coming together to create its irresistible flavor and texture. The primary components include rice flour and urad dal flour, which form the base of the dough. Other key ingredients typically include roasted chana dal (split chickpeas), sesame seeds, asafoetida, curry leaves, red chili powder, salt, and oil for frying. The combination of these ingredients results in a dough that’s both flavorful and easy to work with.
Preparation Method: Making thattai involves several steps, but the process is relatively straightforward. Here’s a basic outline of the preparation method:
- Prepare the Dough: In a mixing bowl, combine rice flour, urad dal flour, roasted chana dal, sesame seeds, asafoetida, curry leaves, red chili powder, and salt. Gradually add water and knead the mixture into a smooth, firm dough. The dough should be pliable enough to roll out easily but not too soft.
- Shape the Thattai: Divide the dough into small lemon-sized balls. Place a ball of dough on a greased sheet of banana leaf or parchment paper and gently flatten it with your fingers to form a thin, round disc. Prick the surface of the disc with a fork to prevent it from puffing up during frying.
- Fry Until Crispy: Heat oil in a deep frying pan or kadai over medium heat. Once the oil is hot, carefully add the shaped thattai discs in batches and fry until golden brown and crispy on both sides. Ensure that the oil is at the right temperature to achieve a perfect crunch without burning the thattai.
- Drain and Cool: Once fried, remove the thattai from the oil using a slotted spoon and drain excess oil on paper towels. Allow the thattai to cool completely before storing them in an airtight container.
Variations and Serving Suggestions: While the classic thattai recipe is delicious on its own, there are countless variations and serving suggestions to explore. Some popular variations include adding crushed peppercorns or grated coconut to the dough for added flavor and texture. Thattai can be enjoyed as a standalone snack or paired with a variety of accompaniments such as coconut chutney, tomato chutney, or spicy mango pickle. It also makes for a delightful addition to festive snack platters and tea-time spreads.
Register for My Upcoming Masterclass HERE

See You in the Live Masterclass
Sunil Chaudhary stands as a preeminent global Leading digital coach, boasting a diverse clientele hailing from over 50 nations. Renowned for his prowess as an exemplary SEO expert, business automation coach, and landing page authority, Chaudhary also holds the distinction of being esteemed as the finest business coach in India. Beyond technical domains, he imparts invaluable insights into mindset, success, and life skills, thus encompassing a holistic approach to mentorship.
Join FREE Courses HERE
Know The Author:
 Sunil Chaudhary aka Suniltams Guruji is India’s Leading Digital Coach. He provides complete Digital Skill Development Coaching with great support. Sunil has trained more than 25000 students and helped more than 1100 businesses so far. Sunil is a well-known face across the world for Digital Coaching.

Digital Success Coach | Best SEO Coach India | Mindset Coach | Life Success Coach